by
Rick Lucas and Roy
Bohnen of Digital Attributes
Specifically
designed for digital photography, the Digital
ColorChecker SG is the latest camera target from
GretagMacbeth. The SG stands for semi gloss. The
whole target has a moderate gloss instead of
having the matte finish of the previous
ColorCheckers.
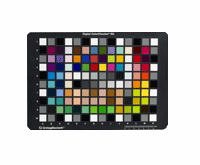
NEW Digital ColorChecker SG
This is intended to extend the
range of tones and colors to more closely match the range of
tones in the real world, which means less interpolation.
This has resulted in more accurate color profiles. Another
feature of the SG target is the series of black, gray, and
white patches around the perimeter. There are used to check
the evenness of light and useful for determining exposure.
With a better
understanding of the SG target, let’s proceed
with the creation of a digital camera profile.
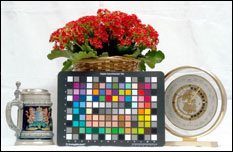
First we need to place the target where we can
evenly illuminate it without shadows or
reflecting colorcasts. Typically this would be
on a wall, hung from a boom, or placed on the
edge of a table. Next we need to evenly
illuminate the target so that the lighting is
even from side to side and top to bottom. You
may use either use one or two lights.
With one light, it is more
difficult to evenly illuminate the target. Differences in
color temperature with two lights can also cause problems
with the capture. With that in mind, it is easier to evenly
illuminate the target with two lights if you know your
lights are carefully matched for color temperature. When
using either one or two lights, it is important that the
lights are placed far enough to the side of the target to
eliminate any glare which is more problematic with the SG
target.
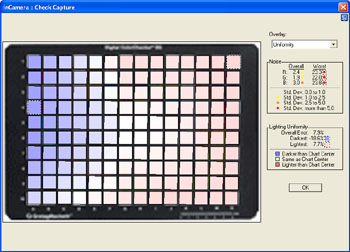
(Example of a poorly
illuminated chart as displayed by the Lighting
Uniformity reporting feature of
inCamera profiling
software. As the lower half of the
information panel indicates, darker patches are
represented with shades of blue and lighter
patches are represented with shades of red. A
perfectly illuminated chart would show all
patches as white.)
With the target evenly
illuminated, the next step is to set up the camera so that
it is relatively square to the target, since later we can
fine-tune the cropping. Other considerations include, but
are not limited to properly adjusting the exposure and
setting the white balance. You know your camera, your
lighting, and your expectations. Follow a consistent
approach when setting up the capture.
The quality of the digital
capture, and the resulting profile is directly related to
the following three items
1. Proper white balance
2. Proper exposure
3. Evenness of illumination on the target
White Balance:
Most digital cameras have a variety of options for setting
the white balance. White balance allows the camera to be
matched to the color of the light source. Different light
sources have different color temperatures, varying from
warm, such as tungsten and incandescent lights, to cooler
light sources such as daylight and shade. For even more
accurate white balance results, we suggest using the custom
white balance if your camera has this option. Depending on
your camera, you will need to photograph a white or gray
card and use all or part of the frame to set the custom
white balance. Review your camera manual for the proper
procedure.
Gray Balance:
If your camera allows you to select part of a frame and the
gray patch of the SG ColorChecker is large enough, set your
gray balance on this area. Many digital cameras only let you
white balance the camera by filling the frame. Typically it
is better to balance a camera using gray instead of white.
Gray generally works better for two reasons. The first is
that there are many different shades of white ranging from
yellow to blue, which may not be discernable to the eye. The
second reason, and more important reason, is due to the
non-linearity of most camera sensors. For example, lets say
we are able to balance the Red, Green, and Blue (RGB) values
of the white card to be an even 240R, 240G, and 240B. Since
the values of all three colors are equal, we have a neutral
color at the highlight area. However, since many cameras are
non linear, if we were to read the gray patch, the RGB
values would not be equal, therefore will not be a neutral
gray. Since our eyes are most sensitive to colors,
especially neutrals from middle gray to light gray; we would
achieve better neutrals if we can balance the white balance
to a gray instead of a white. The SG target gray is a good
neutral to balance the camera, but if your camera doesn’t
allow you balance on this area, there are several other
options available to you. Two options include the Expo Disk
and the other is a light gray card sold by RM Imaging.
Exposure and Illumination:
Once the proper white and gray balance is achieved, the next
step is correct exposure, and finally, evenness of
illumination. We will use the white squares around the
perimeter of the target both to check exposure and evenness.
Using the manual exposure mode of the camera, determine the
proper exposure with the built in light meter, a separate
handheld light meter, or the histogram if the camera has
one. Shoot one frame at this exposure and then vary the
exposure by shooting additional frames by changing the
shutter speed or lens opening. It is recommended that you
incrementally vary the normal exposure by two stops more and
two stops less.
After opening the capture, we are looking for the frame with
proper exposure. What is the proper exposure? By using the
probe or eyedropper in an image-editing program, we are
looking for exposure where the white value of the perimeter
patches is approximately 240 for RGB We will also read a
variety of white squares on different sides of the target
and make sure that are similar to each other. Anything
greater than 5 points in each direction is unacceptable
making the range from 245 to 235.
The black squares are an even better indication of evenness
of illumination with the SG target since they show glare
better. Again we are looking for values not to vary more
than 5 points from side to side and top to bottom. Anything
greater indicates that the lights need to adjusted and the
target shot again.
It may take several adjustments of the lights to achieve the
desired evenness.
If you are using Adobe Photoshop to check for even
distribution of lighting, another trick to use is to change
the Info Palette to display Lab. Move the cursor over the
white, gray, and black patches and check for nearly equal
values within the L channel, which is Luminance. Also check
for a and b values which will show a color cast depending
upon the values displayed.
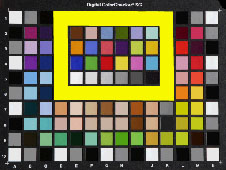
The ColorChecker SG has the ColorChecker built in as shown
in Figure 1.
We have found some cameras respond more appropriately to the
ColorChecker than to the ColorChecker SG when creating the
camera profile. Crop the ColorChecker out of the capture and
experiment with both options.
Figure 1
As a quick review, lets
outline what the software for creating digital camera
profiles is actually doing. The software is used to compare
the capture to the data file of the target. The capture is
the way the camera sees color. The data file describes the
target content. The profiling software compares the capture
to the data file, defines where the differences are, and
creates a profile, optimizing color and tone, much like a
set of eyeglasses do for us.
This overview was written by Rick Lucas and Roy Bohnen of
Digital Attributes.
Digital Attributes is a
group of consultants providing national and international
coverage for color management consulting, assessment,
installation and seminars.