|
Photoshop Lightroom users can utilize the full power, ease and functionality of iCorrect EditLab ProApp with seamless integration via the Photo>Edit In... menu. Edits made using the software within Lightroom are non-destructive in nature, with edits applied automatically to a newly generated TIFF file and not the original. iCorrect EditLab ProApp is a stand-alone program featuring the same color technology that make up our popular Photoshop plug-ins. At the heart of iCorrect EditLab ProApp is our award-winning color architecture with its unique, frustration-free approach to color correction and color editing. consists of four separate tool panels identified by four distinctly numbered tabs. The four panels are logically arranged from left to right and offer a wizard-like approach to accurate color. The tools are designed in such a way that as you progress from left to right, the tools will not, and in fact cannot affect any of the tools to its left. This alleviates the common frustration of correcting for one thing while throwing off another. With iCorrect EditLab Pro, one pass through the tools and you are finished. iCorrect EditLab ProApp also features ProcessQ, an image queue that allows users to manage color corrections for efficient, time-saving workflows. After images are added to ProcessQ via Lightroom, they are displayed as thumbnails in the filmstrip at the bottom of the main panel. With ProcessQ, users can correct and save any number of images - either one at a time or as an entire group. Users can even Synchronize adjustments across multiple images. iCorrect EditLab ProApp also takes advantage of Lightroom and its efficiencies for every day tasks, like the ability to edit multiple images in one session. Tutorial: Using iCorrect EditLab ProApp with Adobe Photoshop Lightroom
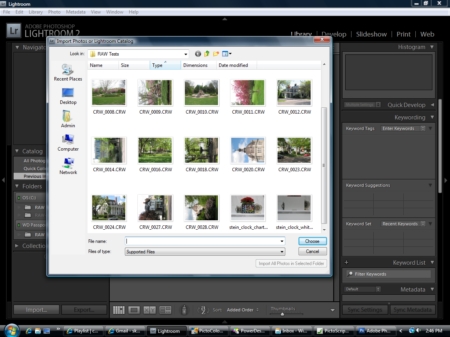
Step 1: Import Photos into Lightroom Library
Begin by importing image files into Lightroom library by clicking on the Import... button on the main panel and selecting your image files.
Step 2: Select One or Multiple Photos for Editing in iCorrect EditLab ProApp Select one or more photos for editing in iCorrect EditLab ProApp and launch the program via the Photo>Edit In... menu. (Note: iCorrect EditLab ProApp is located in the PictoColor Folder in the 32 bit Program Files Folder on 64 bit computers-Win 7/64 bit: C/Program Files (x86)/PictoColor/iCorrect EditLab ProApp6.0)
Prior to editing images within iCorrect EditLab ProApp via Photoshop Lightroom, you will want to set a few workflow and file handling preferences to ensure a correct and seamless integration between the two programs. The first is to ensure that the Working Space is the same for both. For Lightroom, this is done in the Edit>Preferences>External Editing menu.
For iCorrect EditLab ProApp, it is done in the File<Preferences<Color Management Preferences menu.
Upon launch, all selected images will automatically be added to iCorrect EditLab ProApp's ProcessQ and appear in the filmstrip at the bottom of the program.
Step 3: Make Edits Using the Four Tool Sets Working from Left to Right
Step 4: Save Changes Back to Images in Lightroom Library After making edits to all images, simply select them all and click the Save all button. Make sure that the Save Image Preferences within iCorrect EditLab ProApp are as follows. File Folder: Same as original; File Format: Same as original; File Name: Append Suffix (blank). Also, for convenience, check option Remove Saved Images from the ProcessQ.
After saving changes, the Lightroom Library will automatically apply the edits to the newly generated TIFF file. They are now ready for additional editing within Lightroom or may be exported in various formats for a wide range of uses.
|

|
|
|||
|
|
|
DEMOS
|


